With Cloud Run, just bring your code! Google handles the complex server stuff and scaling, so you don’t have to. Typically, you could run only web services with a URL on Google Cloud Run as services. For some time now, you can also run Cloud Run Jobs to execute a task to completion, which might take longer than minutes or even hours. In this beginner-friendly post, you will learn how to run jobs on Cloud Run Jobs on a schedule. Let’s get going!
Table of Contents #
Cloud Run Jobs #
Unlike Google Cloud Run services, which are executed when a web server receives a web request (such as a GET or POST), Cloud Run Jobs are specifically designed for tasks that need to run, perform some work, and then terminate once that work is complete. They don’t listen for incoming requests like services do.
Cloud Run Jobs are task-oriented, executing a specific piece of work, such as scraping a website, converting a PDF invoice to database records, taking a screenshot, fine-tuning an LLM, or resizing images. They do not require a web server and can be triggered one-off, at a specific time (such as 2 am each morning) or as a part of a GCP Workflow. These jobs run to completion and can run up to 10,000 tasks in parallel. Tasks have an index number and a count of runs; tasks can also be configured to retry.
In essence, if you have a containerized task that needs to run periodically, on demand, or part of a workflow and complete its work without serving requests, and then shut down, Cloud Run Jobs are a suitable serverless option on Google Cloud.
How Cloud Run Jobs handles parallel tasks #
One of the powerful features of Cloud Run Jobs is its ability to handle parallel task execution. This is particularly useful for batch processing workloads where you can divide the work into independent chunks that can be processed concurrently. You can execute up to 1,000 jobs per project per region, as outlined in the Cloud Run quotas.
When you define a Cloud Run Job, you can specify the parallelism setting. This setting determines the maximum number of Task Instances that can run concurrently within a single Job Execution.
Imagine you have a job that requires processing 100 items, and your container is designed to process one item at a time. If you set parallelism to 10, when you execute the job, Cloud Run Jobs will attempt to run up to 10 Task Instances simultaneously. Each Task Instance will receive information about which specific item(s) it should process.
How does a Task Instance know which part of the work to do? Cloud Run Jobs provides environment variables to each Task Instance:
CLOUD_RUN_TASK_INDEX: This variable provides a unique index for each Task Instance within a Job Execution, starting from 0 up toparallelism - 1.CLOUD_RUN_TASK_COUNT: This variable provides the total number of Task Instances expected for this Job Execution, which is equal to theparallelismsetting.
Your container’s code can read these environment variables to determine its specific slice of the work. For example, if you have 100 items to process and parallelism is set to 10, Task Instance 0 might process items 1-10, Task Instance 1 processes items 11-20, and so on, up to Task Instance 9 processing items 90-100. Your code would use CLOUD_RUN_TASK_INDEX and CLOUD_RUN_TASK_COUNT to calculate the range of items it’s responsible for.
Cloud Run Jobs manages the lifecycle of these Task Instances. If a Task Instance fails (e.g., due to an error in your code or a temporary infrastructure issue), Cloud Run Jobs can be configured to retry that specific Task Instance up to a specified number of times. This ensures that even if some parts of your batch fail, the overall job execution can still complete successfully by retrying the failed tasks.
The ability to run tasks in parallel significantly speeds up the execution of batch workloads. Instead of processing 100 items sequentially in one container, you can process them concurrently across multiple containers, which drastically reduces the total time required for job execution. This is similar to having various workers tackle different parts of a large project simultaneously, rather than having one worker complete everything step by step.
By default, each task runs for a maximum of 10 minutes. You can modify the default value by changing the task timeout setting, up to a maximum of 168 hours (7 days). Support for timeouts greater than 24 hours is available in Preview.
Simple Cloud Run job example #
This tutorial focuses on learning how to create and run Google Cloud Run Jobs on Google Cloud Platform (GCP). The code example you will use is the official Node.js quickstart for Cloud Run Jobs.
You will use the gcloud cli command over Google Cloud Shell to do most of the work, and you will not need to install anything on your local machine. Let’s get started!
The main index.js file has the following contents:
const {CLOUD_RUN_TASK_INDEX = 0, CLOUD_RUN_TASK_ATTEMPT = 0} = process.env;
const {SLEEP_MS, FAIL_RATE} = process.env;
const main = async () => {
console.log(
`Starting Task #${CLOUD_RUN_TASK_INDEX}, Attempt #${CLOUD_RUN_TASK_ATTEMPT}...`
);
if (SLEEP_MS) {
await sleep(SLEEP_MS);
}
if (FAIL_RATE) {
try {
randomFailure(FAIL_RATE);
} catch (err) {
err.message = `Task #${CLOUD_RUN_TASK_INDEX}, Attempt #${CLOUD_RUN_TASK_ATTEMPT} failed.nn${err.message}`;
throw err;
}
}
console.log(`Completed Task #${CLOUD_RUN_TASK_INDEX}.`);
};
const sleep = ms => {
return new Promise(resolve => setTimeout(resolve, ms));
};
const randomFailure = rate => {
rate = parseFloat(rate);
if (!rate || rate < 0 || rate > 1) {
console.warn(
`Invalid FAIL_RATE env var value: ${rate}. Must be a float between 0 and 1 inclusive.`
);
return;
}
const randomFailure = Math.random();
if (randomFailure < rate) {
throw new Error('Task failed.');
}
};
main().catch(err => {
console.error(err);
process.exit(1);
});
The main things you need to understand here are:
- The script executes with the
maincall on line no. 49, which has a catch attached to it. It would have been easier with a JavaScript try catch block, but this is the official example. So, let’s just roll with it. - Before the
mainfunction on line 7, four environment variables are taken out of theprocess.envwith object destructuring. Those areCLOUD_RUN_TASK_INDEXandCLOUD_RUN_TASK_ATTEMPT, which are used to determine the task’s position within the job and the retry attempt (if the job has failed). - The other two are
SLEEP_MSandFAIL_RATE, which are used to sleep for a given number of milliseconds and specify the failure rate as a percentage, respectively. For example,0.1represents 10% and1.0represents 100%, which will never work. - The main task (in the job is the
mainfunction), which logs the task number and the attempts first. - Then it waits for the specified milliseconds and, next, randomizes the failure according to the failure rate.
- Lastly, it logs the index of the computed tasks.
- Below that, there is a
sleepfunction to just block the process and wait for the specified number of milliseconds.
Next, you will see how to add it as a Cloud Run job using the Google Cloud Shell.
Create a Cloud Run Job using Google Cloud Shell #
To get started, you will need some knowledge of Git, GitHub, and Google Cloud Shell.
Given that you are logged into your Google account. First, you will create a new Google Cloud Project on this page. You can name it cloud-run-jobs as seen below:
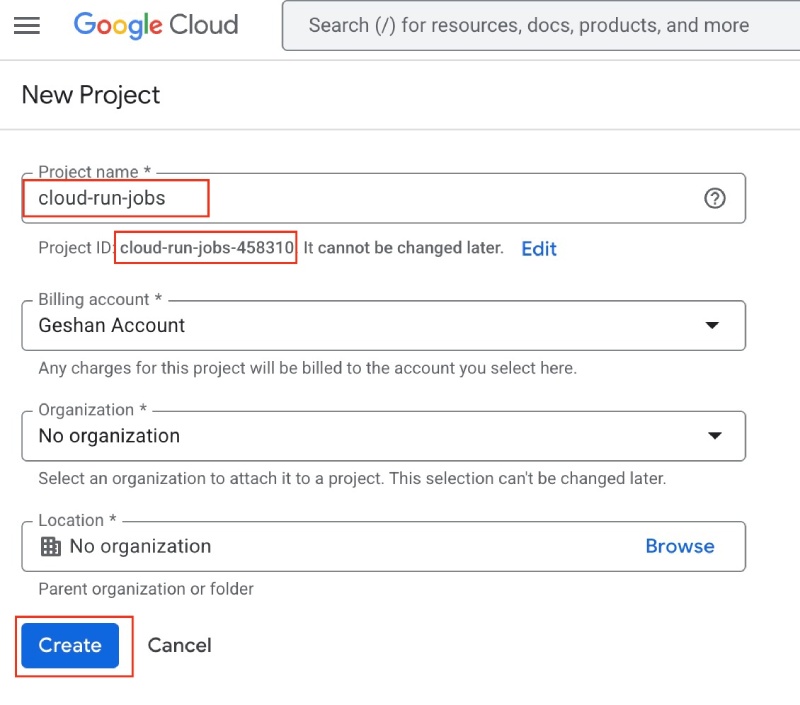
Ensure that you copy the Project ID, as you will need it later, and then click the Create button at the end of the form. It will take a couple of minutes, and you will be taken to the dashboard of the new project as follows:

Ensure that the recently created project is selected; alternatively, you can click Select Project from the notification message.
After that, click on the Cloud Shell icon besides the bell icon on the top right (or press g and s, on your keyboard). The Cloud Shell will appear at the bottom of the screen and ask for permission. Click Authorize:
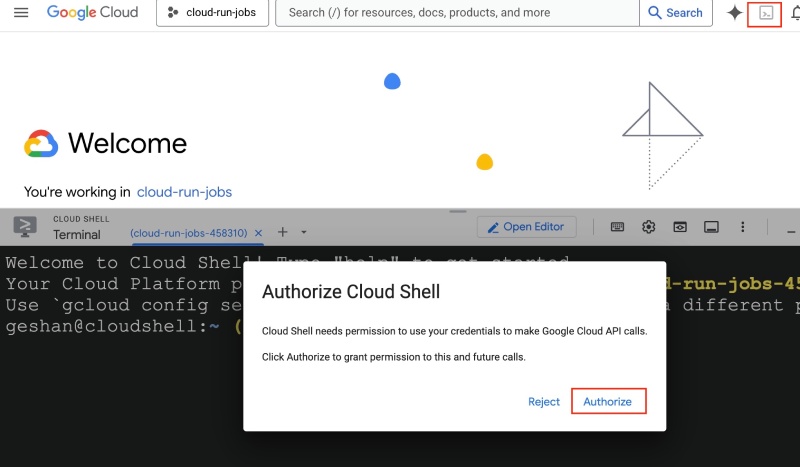
In the shell, type in (or copy and paste) the following command:
mkdir projects && cd projects && git clone && cd cloud-run-jobsThe command will create a directory called projects, go into that folder and clone the demo repository with the above code, and go into the cloud-run-jobs repository folder as follows:

After that, set the project ID variable to the variable you copied while creating the project (or copy it from your Google Cloud CLI), it should look like cloud-run-jobs-, which in my case was cloud-run-jobs-458310. The command is below:
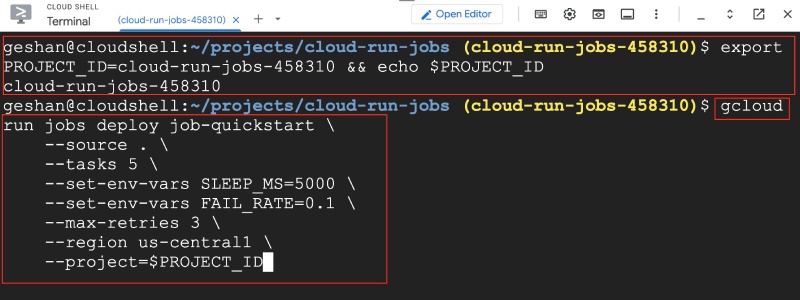
export PROJECT_ID=cloud-run-jobs-<some-numbers-here-replace-this> && echo $PROJECT_IDNow, to create the Cloud run job after building from source with a build pack (not using a Docker container), run the following command on your Google Cloud Shell:
gcloud run jobs deploy job-quickstart
--source .
--tasks 5
--set-env-vars SLEEP_MS=5000
--set-env-vars FAIL_RATE=0.1
--max-retries 3
--region us-central1
--project=$PROJECT_ID
Here you are asking Google Cloud Command to create a Cloud Run job called job-quickstart , where the code is taken from the local directory .. You are specifying that the job has five tasks and will sleep for 5 seconds (5000 milliseconds) with a 10% failure rate (0.1) and can be retried up to 3 times on failure.
For the region you are using us-central1, and the project ID is the same as you set in the previous command. It looks like the below when it executes:
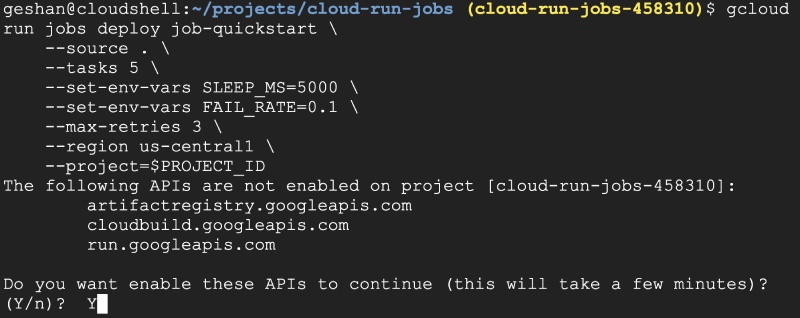
It will ask you to enable APIs, hit Y to enable all related APIs, as seen below:
If you encounter an Error, it may be because the APIs require some time to become enabled. So, try again after a couple of minutes. When it works, it will look something like the following:
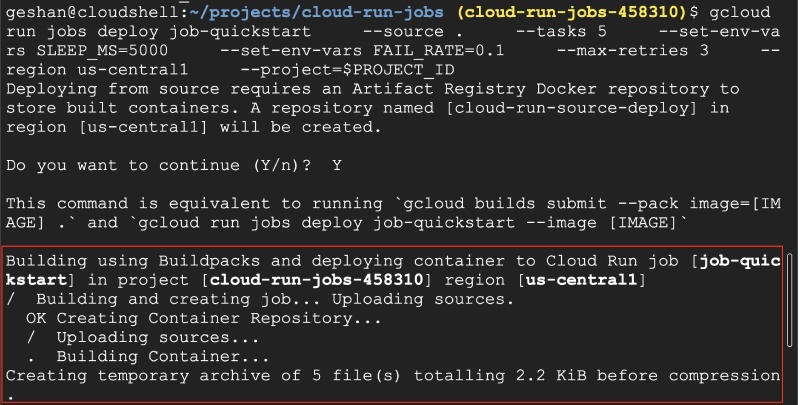
It will take some minutes for the code to be copied to a bucket and then built with build packs on Google Cloud Build. If you want to follow the build process, you can open the visible URL on a new browser tab, ti will look something like this:
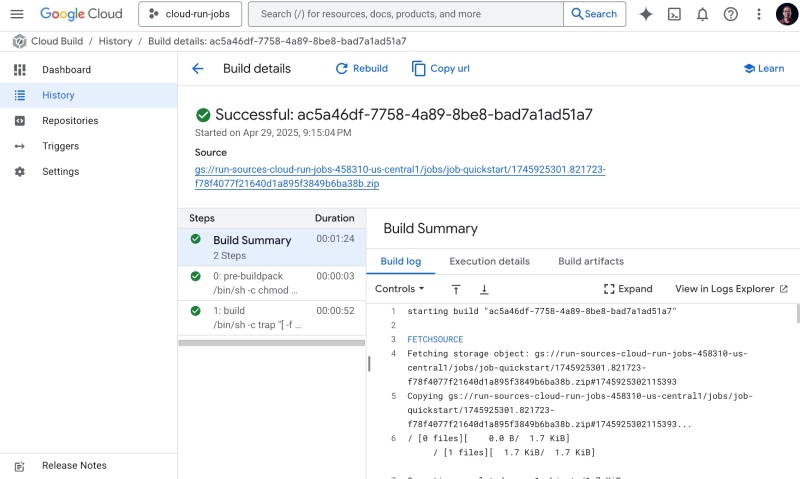
When it is successful, it will show you something like the following:
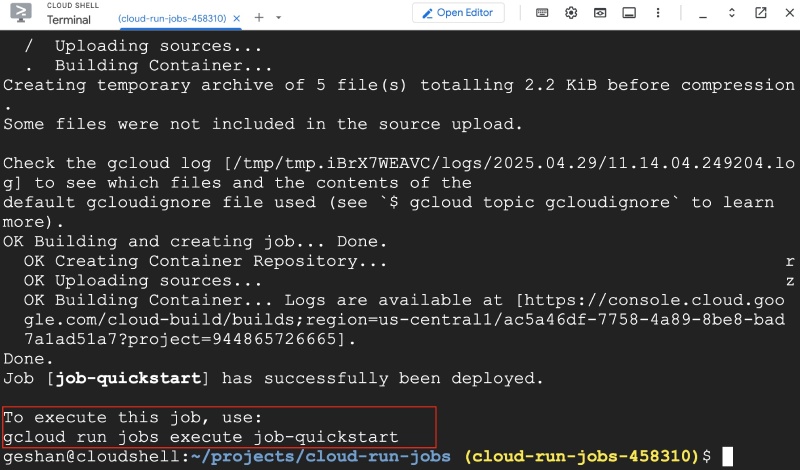
At this point, search for Cloud Run and click the first result:

After that, click the Jobs tab, and you will see your Cloud Run job has been created:
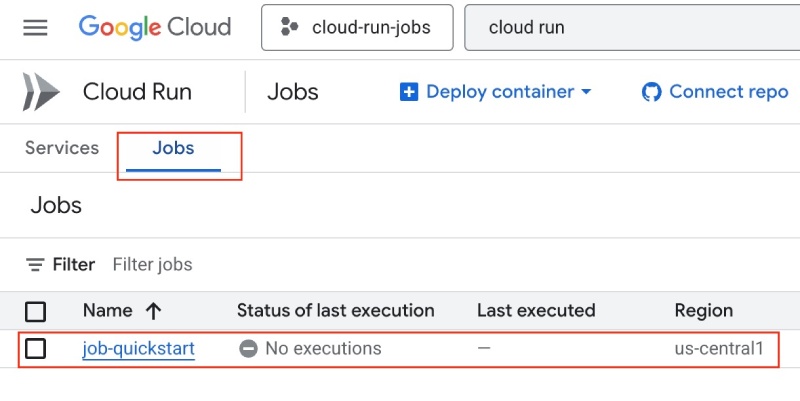
But this job has never run, to run the job on demand, execute gcloud run jobs execute job-quickstart --region=us-central1 on the Google Cloud Console as seen below:
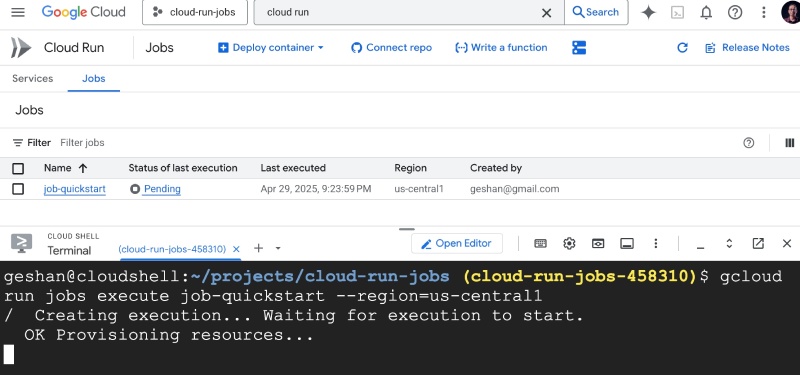
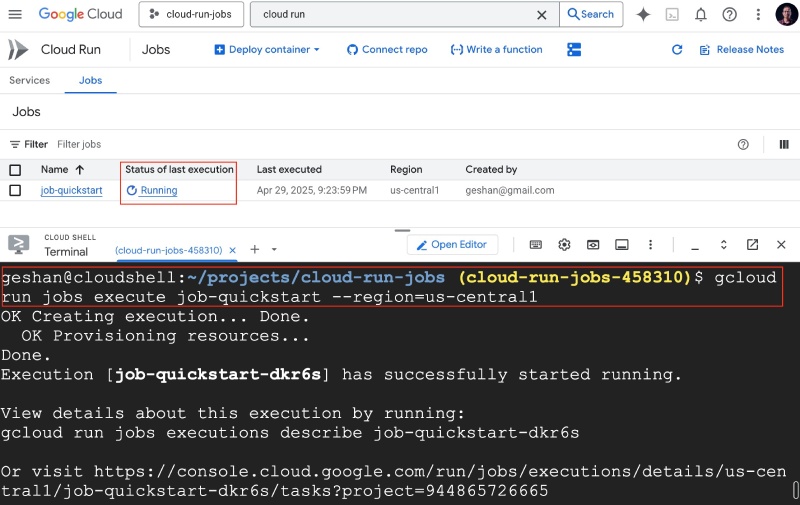
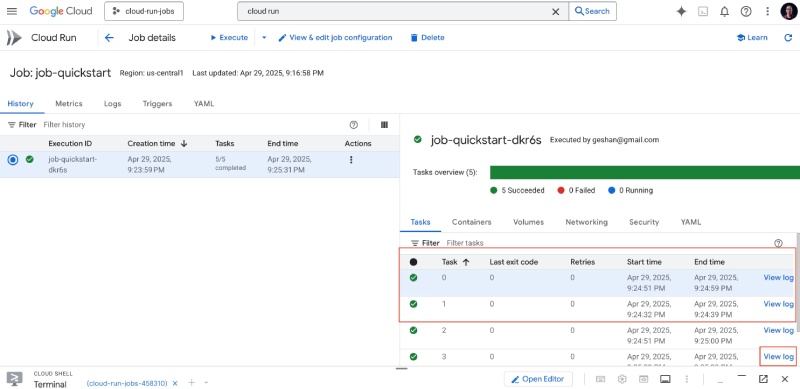
You will see the job run. If you click Running and wait for the task to execute, you will see that all five tasks in the job have run successfully:
You can also view logs of each task if you want:
Create a job schedule with Google Cloud Scheduler #
To run jobs on a schedule, please follow the guide, which outlines the process of scheduling jobs using Google Cloud Scheduler.
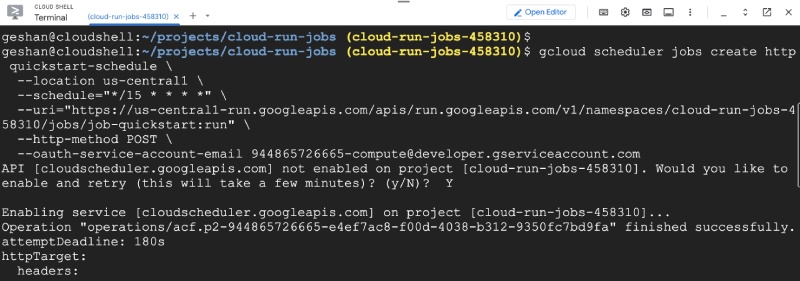
It can be done by running the following command on Google Cloud Shell to run the job every 15 minutes:
gcloud scheduler jobs create http quickstart-schedule
--location us-central1
--schedule="*/15 * * * *"
--uri="
--http-method POST
--oauth-service-account-email 944865726665[email protected]
You can find the project number on the project dashboard page, you will need to modify the command to your project id and number. It looks like the below when run:
If you go to your cloud scheduler page for the project, you will find the schedule you just created:

You can do a Force Run selecting the option from the ... on the right side of the schedule. I tried it and it worked for me. I waited for a few minutes so that it would be triggered again on time.
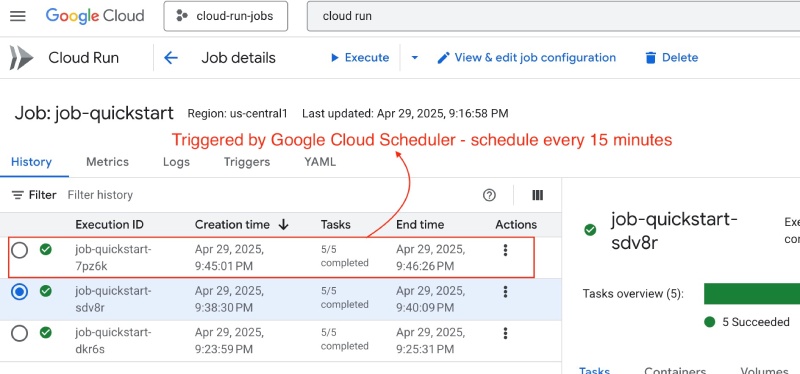
That’s it; it is best to delete the schedule and the job if you’re testing it out.
Conclusion #
In this post, you learned about Google Cloud Run Jobs and their usage. You also learned how to create and run Cloud Run jobs on a schedule with Google Cloud Schedule with a simple Node.js Example. I hope you can utilize Cloud Run Jobs to execute tasks efficiently. Keep learning!


