

Unlike digital audio playback that rarely requires anything more than connecting your music streamer or CD player to the rest of your system with a single cable and making a few changes within your preferred music steaming app to maximize the playback quality, listening to records offers a few more challenges that can make or break the listening experience. Your phono cartridge setup plays a massive part in the experience and there are some things you need to know — especially if this is your first turntable.
Are you happy with the playback quality? We sold the record listening experience over the past decade to a new generation of listeners and our inbox is full of questions and complaints from those same people who are not convinced that they are getting the full experience.
We’ve devoted a lot of space to audiophile turntables, phono pre-amplifiers, and all of the accessories you might need to maximize your experience but not enough attention has been paid to phono cartridge setup.
Setting up a phono cartridge correctly is important to ensure optimal sound quality and to prolong the life of your cartridge and records; and that last part is extremely important because dirty records will damage your stylus and shorten its lifespan.
You read that last part correctly. All of those “used” records that you picked up from your local garage sale, Grandma’s attic, or local record store — they all come with their own unique history including grunge (pet and human hair, smoke, dust, precious bodily fluids) that has become entrenched in the grooves. And that doesn’t even include the scratches or dings.
We have some excellent and affordable cleaning options worth considering here that you can read about.
It might surprise you to learn that “new” records are also slightly dirty and that can arise during the pressing process. Clean your records.
Most consumers looking at their first turntable, generally look for models that come with a phono cartridge that has been pre-installed and supposedly set-up correctly at the factory.
That isn’t always the case and you generally have to set the tracking force and adjust the counterweight depending on the model. Remember to read the supplied instructions and articles like this to minimise the set-up frustration.
If you buy a table with a pre-installed cartridge and you’re happy with the sound, that’s great. If you ever decide to upgrade that cartridge – you need to pay attention to our first bit of advice because not every cartridge will work with your tonearm.
Choose the right tonearm: Select a tonearm that is compatible with the cartridge you have chosen, and has the right effective mass, compliance, and overhang to work optimally with your cartridge.
Mount the cartridge: Follow the manufacturer’s instructions for mounting the cartridge to the tonearm. Ensure that the cartridge is mounted securely and aligned properly, with the correct azimuth, overhang, and vertical tracking angle.
Balance the tonearm: The tonearm must be balanced so that it remains level when tracking a record. This involves adjusting the counterweight until the tonearm floats freely with the cartridge in place.
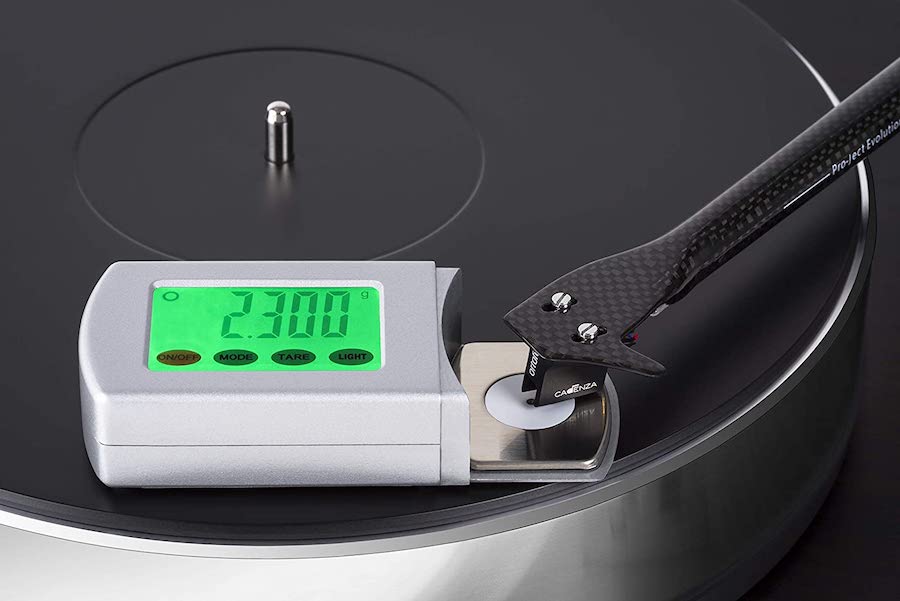
Choose the right stylus force: The correct stylus force will depend on the cartridge you have, but typically, it’s between 1.5 and 2.5 grams. Check the manufacturer’s specifications for the recommended force and use a stylus force gauge to set it accurately.

Align the cartridge: Aligning the cartridge correctly is important for optimal sound quality and to prevent damage to your records. This includes ensuring that the cartridge is parallel to the record, and the stylus is centered over the groove. There are several popular alignment protractors available to help you with this step.

Adjust anti-skating: Anti-skating helps prevent the stylus from skating towards the center of the record, causing unequal wear on the record and affecting sound quality. The anti-skating force should be set to the same value as the tracking force.
Connect to the preamp: Finally, connect the cartridge to a phono preamp, which amplifies the cartridge’s low-level output signal to line-level.
Calibrate the phono stage: Adjust the phono preamp’s gain, impedance, and capacitance to match your cartridge’s specifications.

Check the stylus condition: Regularly inspect the stylus for signs of wear and replace it as needed. A worn stylus can cause damage to your records and degrade the sound quality.
The Bottom Line
It doesn’t matter if you are a casual listener or deeply invested in your record collection — proper phono cartridge set-up is critical to enjoying the vinyl listening experience.
And it doesn’t matter if you are using an entry-level turntable or a state-of-the-art turntable like the $18,000 Kuzma Stabi R with a $5,000 Hana MC — the same setup issues apply to the tonearm and cartridge.
The best turntables in the world can sound amazingly average if the cartridge is not properly installed.


