

Do you have multiple audio files you want to combine into one file? If so, you have multiple ways to do that on your Windows 11 PC. I’ll show you how to do that using both graphical and command-line methods.
Merge Multiple Sound Tracks Graphically Using Audacity
The easiest graphical way to merge audio files on Windows 11 is by using the free and open-source Audacity app. You can use this app to edit your music tracks in many ways, including combining your files.
To use it, visit the Audacity site and download and install the app on your PC. Launch the app. From the menu bar, select File > Import > Audio (or press Ctrl+Shift+i).
In the Select One or More Files window, open the folder containing your audio files. Highlight all the files you want to merge and select “Open.” If your files are in different folders, select File > Import > Audio again and choose those additional files.

Your files will appear in Audacity. You’ll now put these files one after another to then combine them. To do that, select all files by choosing Select > All from the menu bar or pressing Ctrl+A.

You’re ready to align your files. To do that, from the app’s menu bar, select Tracks > Align Tracks > Align End to End.

Your files are now one after another. To now combine these files into a single track, from Audacity’s menu bar, choose Tracks > Mix > Mix and Render.

Your files are now merged into one track. You can play this track by clicking the Play button in the toolbar. To bring this track outside of Audacity as a music file, from the app’s menu bar, select File > Export Audio (or press Ctrl+Shift+E).

On the How Would You Like to Export window, choose “Export to Computer” since you want to save the resulting file on your PC.

The Export Audio window will launch. Click the “File Name” field and type a name for the resulting file. Select “Browse” next to Folder and choose the folder in which you want to save the file. Click “Format” and select an audio format for your file (choose “MP3 Files” if you aren’t sure, as this format plays on nearly all devices).
Optionally, configure other options. Then, click “Export.”

Wait for Audacity to finish merging your files. This can take anywhere from a few seconds to several minutes, depending on the number of files you’ve chosen and your files’ playback duration. When the files are all merged, you’ll see the resulting file in your chosen folder.
Combine Multiple Audio Files From Command Prompt With FFmpeg
If you’re looking for a command-line method to merge several audio files, FFmpeg is the best way to do that. This free and open-source tool allows you to edit your media files using many ways, including combining them.
To do that, launch the FFmpeg site and download the app’s archive to your PC. Extract the archive and copy all the extracted folders. Access the C drive’s root folder, create a new folder called ffmpeg here, and paste the copied folders in this new folder. Open the “bin” folder, select the address bar, and copy the folder’s full path to your clipboard.

Launch Windows Search (press Windows+S), type Edit Environment Variables for Your Account, and select the item with that name. On the open window, in the User Variables for [Your Username] section, choose “Path” and click “Edit.”

In the Edit Environment Variable’s right sidebar, click “New.” Paste the path you copied before and choose “OK” at the bottom.

Close all open windows. Launch File Explorer (press Windows+E) and find the folder containing your audio files. Click the address bar and copy the full path to the folder. Then, access Windows Search (press Windows+S), type Command Prompt, and select “Run as Administrator.” Choose “Yes” in the User Account Control prompt.
On the Command Prompt window, type the following command replacing “PATH” with the path you’ve copied, and press Enter.
cd “PATH”
Then, type the following command and press Enter. This command makes a list of all the MP3 files in the current folder and saves that list in the filelist.txt file. It then engages FFmpeg to merge all the files listed in the file list into a single file called merged_audio.mp3.
(for %i in (*.mp3) do @echo file '%i') > filelist.txt && ffmpeg -f concat -safe 0 -i filelist.txt -c copy merged_audio.mp3

When Command Prompt (via FFmpeg) has merged your files, you’ll find the resulting file in the same folder as the original files.
Use Sound Recorder to Manually Record Your Audio Files
If you’re looking for a basic way to merge two or more audio files, ideally short ones, you can use Windows 11’s built-in Sound Recorder app. With this app, you basically record your multiple audio files, creating a single output file. Note that this method might add some noise from your surroundings as well, as the app basically records the audio from your PC’s microphone.
To use this method, launch Windows Search (press Windows+S), type Sound Recorder, and open the app. Then, open File Explorer (press Windows+E), find your first audio file, and play it using your favorite media player. As soon as the file begins playing, in Sound Recorder, click “Start Recording” (the red button) or press Ctrl+R.

When the first file finishes playing, play the next file you want to merge. This way, when you’ve recorded all your audio files, click “Stop Recording” (the black button) or press Esc.

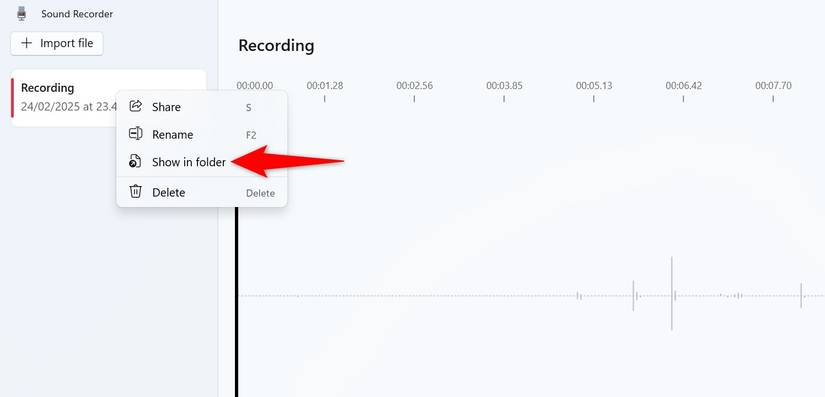
In Sound Recorder’s left sidebar, you’ll see the resulting file. This file contains your multiple audio files. To play it, click the file and choose the Play button. To view the file in File Explorer, right-click the file and choose “Show in Folder.”
If you don’t want to install and use a desktop app to combine audio files, use one of the many web-based tools. These tools run from your web browser and allow you to merge multiple of your audio files into one. Two such tools you can use are Clideo and Audio Joiner.
To use Clideo, for example, launch its site. Click “Choose Files” and select the files you want to merge. You can also drag and drop your files onto the site to upload them. To add files from Google Drive, Google Photos, or Dropbox, click the down-arrow icon next to Choose Files and select the appropriate option.

Wait for the files to be uploaded. When that’s done, on the timeline, drag the audio clips and arrange them the way you want them in the resulting file. To add more files, click “Add More Audios” and choose your files.
When you’re happy with the selection, in the site’s bottom-right corner, click “Export.”

The site will begin merging your files. When that’s done, on the right side, click “Download” to save the resulting file to your PC. If you want to make any changes, click “Edit.” To upload the file directly to Google Drive or Dropbox, next to Download, click the down-arrow icon and choose the appropriate option.

And that’s how you make one file out of multiple audio files on your Windows 11 PC. Like that, you can convert your media files from one format to another as well.


